Pages

Monday, December 12, 2016

A Canadian Girl's Guide to NYC at Christmas: Tips for making your trip extra special!

I am super excited to be teaming up with Alex Inspired and an amazing group of Canadian bloggers for my first ever Blog Hop. Find the links to their blogs below my post and visit all of their pages for more holiday inspiration!

Have you watched Serendipity a hundred times while dreaming of skating at Rockefeller Centre?
Does the scene in Elf where they are trying to get Santa's sleigh to fly, make you want to be in Central Park, stat? 
Do you dream of the Rockettes kicking their way across the stage?

If you answered yes, then this is the post for you!

New york city at Christmas time - pictures of New York landmarks and christmas events

Earlier this year I visited NYC for the first time with my girlfriends for our 30th Birthdays, see post here. I.loved.every.minute.of.it. My husband, in an effort to make this year awesome (despite our baby troubles) surprised me by saying we would be going for the Christmas tree lighting! What this actually meant was that I would have to do all the planning, but hey, I am not complaining!

It was a dream trip, and many of my bucket list items were checked off! I know so many of my friends have always dreamed of NYC at Christmas, so I have compiled my top 4 tips for planning your NYC getaway.

1. BOOK EARLY & CHOOSE WISELY!

It's New York, things are not going to get any cheaper (especially with the exchange rate๐Ÿ˜‚) so book as soon as you can!

Hotel: I booked our hotel 4 months ahead. We stayed at the Hilton Garden Inn on West 35. I highly recommend this location; it was across the street from Macy's, there was a subway station right outside the door and it was in the middle of everywhere (they don't call it midtown for nothing!) 
Don't feel like you need to stay in Times Square, I would actually say do not stay in Times Square - save the extra dollars it will cost you and explore a different area, you will go to Times Square anyways! I stayed in TS my first trip and preferred the Midtown location.

Flights: NYC has 3 airports, so choose carefully when booking your flight. If you choose the very large JFK you might be spending upwards of $80 to get downtown. LaGuardia (LGA) however, is the closest to midtown; it cost us about $30-$40  to get to our hotel (depending on traffic and time of day). There are airport shuttles that run about $15 as well, so it just depends what you want to do. See more details here. I would always choose LGA, if you can get a flight through there that works.

2. ACTIVITIES

Where do we start? This is the best part, you have to decide what are your MUSTS!

Mine were:
- Seeing the Rockettes Christmas Spectacular
- Carriage ride in Central Park
- Ice skating
- Macy's Santa Land
- Window Shopping on 5th Avenue
- Christmas tree lighting in Rockefeller Center
- Visiting the Chelsea Market and the Highline (Food Tour)

I feel like these may be everyone's musts, so let me start by sharing our itinerary and then I will give you some specific advice about each activity.

Day 1
11:00am Arrive in NYC at LGA, go to hotel and check in
1:00pm Visit Times Square, have lunch 
3:00pm Lion King
5:30pm Walk to Rockefeller Center and back to hotel to change for dinner
7:45pm Dinner at Chef's Club
9:00pm Quick wander through Macy's

Day 2
10:00am Food Tour of Chelsea Market/Highline (Trip highlight!)
3:00pm  Carriage ride in Central Park
4:00pm Stroll down 5th Avenue (to check out the window displays)
5:00pm Back to hotel to change
6:00pm Arrive at Rockettes (Trip highlight!)
9:00pm Visit Bar 65 at Top of the Rock (Amazing city views, while enjoying a drink). We did this instead of the Empire State Building.

Day 3
9:00am  Breakfast at Best Bagel and Coffee
9:30am  Shopping at Macy's and visit to Macy's Santa Land (only visit Santa Land right after it opens or just before close to save you from a giant line)
11:00am Visit the NY public Library
12:00pm Shopping in SOHO
2:00pm  Lunch at Gramercy Tavern
3:30pm More shopping!
6:00pm Back to hotel
7:30pm Dinner at Chelsea Market
9:00pm Wander through Bryant Park

Day 4
9:00am Visit Grand Central Station
10:00am Walk to Rockefeller Center - see Christmas tree set up
4:30pm Stroll through Central Park
5:00pm Happy Hour at the Food Hall below the Plaza Hotel
6:30pm Dinner at Obao (Thai food)
8:00pm Billy Joel at Madison Square Gardens
10:30pm Rockefeller Centre to see the lit tree
11:30pm Max Brenner for hot chocolate
12:30am Late night pizza search
Fly home the next morning

Extra Tips
Booking a Broadway show. If you are going to book a show for the day you arrive, especially at this time of year, I recommend getting the ticket insurance. You will see the option for this as you are going through your ticket purchase online. This insurance will reimburse 100% of your ticket cost, if your flight gets delayed or canceled, or for a variety of other reasons.
When you get up at 4am in Canada and are at the Lion King in NYC at 3pm #hesexcited
Ice Skating. There are many options for going ice skating in NYC, I would say the top 3 are Rockefeller Center, Central Park or Bryant Park. All are great, it just depends on what you are looking for. Rockefeller Center is the most expensive place and also the busiest, the other two are a little less well known, but still offer a fun experience.  I actually think Central Park has the best view, as you see the skyline of buildings, while surrounded by all the beautiful trees. Strangely enough, we didn't end up skating because when we got to Central Park I felt like I would be doing it just to do it, so we skipped it, although I thoroughly enjoyed watching other people skate!
Rockefeller Center
Carriage Ride. It's not cheap, a 45 min tour costs $118 + tip, but when your feet are hurting and you need a bit of a break from walking, it was a little bit of heaven! We did it in the afternoon, but I imagine the evening would be beautiful as well! No need to book ahead, there are lines of carriages waiting when you get there.

Rockefeller Center's Christmas Tree Lighting. This was the entire reason for our trip timing and it almost didn't happen! Months after booking our flights and hotel, they changed the date. I only noticed because I was looking to see if they had released the concert details. Rockefeller Center's website didn't even acknowledge that they had done this, I found another website that confirmed it. When I called to complain they were rude and unhelpful. Luckily, my amazing boss let me extend my trip (and it only cost several hundred dollars to change flights and add an extra night at our hotel ๐Ÿ˜’).

Fortunately, the tree lives up the hype! It is the biggest, most beautiful tree I have ever seen, but the lighting event itself is not a MUST. The standing area is quite small and you have to be willing to be there for 6 + hours to get a good spot. The concert is on the rink level, so only a few people get down here (not even sure how). This year it poured rain the entire day and night and no one in the area was allowed an umbrella, so those who stayed got completely soaked. Jeff and I went to see Billy Joel instead (this was Jeff's bucket list and it was totally amazing) and we back after to see the tree. I held my umbrella down and had my own little reveal and it was incredible! I recommend booking your trip to be there after the tree is lit so you can enjoy it, but the lighting itself isn't as great as it might seem #tvmakeseverythingbetter

3. FOOD

Don't panic, but in NYC people book restaurant reservations a month early! This doesn't mean you can't get in later, it just means you may want to plan ahead for some places, depending on their popularity. Download the app Open Table, it's very easy and you can book everything through this, as well as see reviews. I was overwhelmed with work before our trip, so I only booked one ahead of time (Chef's Club) the rest we booked the day of, or just showed up at.

Food is one of the most fun parts of NYC as they literally have everything! You can spend as much or as little as you want on dining, from the highest end world famous restaurants, to the $1 pizza slices and hot dog carts. I would say have a few places booked or in mind that you want to try, but for the rest, explore, get lost, stumble on something and try it out! *It doesn't hurt to check TripAdvisor reviews.*

My Top 4 Food Picks:

 It is quick, cheap and delicious!

Lunch/Dinner: Gramercy Tavern
I had a brussels sprout dish I will dream about and a Harvey Fitz Spitz  that was to die for! 

Dinner: Chef's Club
Sitting at the counter you get to watch the chefs as they prepare fresh, renowned dishes, with recipes on loan from world famous chefs. Excellent service and delightful dishes!
Chef's Club - NYC
Dinner and a Show- Chef's Club

Any time of day: The Chelsea Market
Seemingly endless, beautiful novelty foods in a historical building, there is so much to see and try! Keep your eyes open for celebs like Rachel Ray picking up ingredients (Food Network is upstairs), Whoopi Goldberg getting our (I can say our because it's mine too) favourite grilled cheese or Hugh Jackman strolling back to his nearby home. I didn't see them, but I did see Damien Lewis casually eating his lunch. Make sure to visit Lucy's Whey for a life-changing grilled cheese - I had the aged cheddar and fig jam one *drools* just.do.it

#timessquareselfie

And that's it, friends! If you have any questions or want to share some of your NYC favs, comment below! Now, be sure to hop on over to explore some more holiday tips from these fabulous ladies!


Alex Inspired | Sunshine & Sugar | The Dream House Project | Glittering Ambition Lesley Metcalfe | The Lunchbox Season | Elizabeth Montilla Design | Once Upon a Maison | The Healthy Garage


Friday, October 21, 2016

What I am thankful for...


During this season of Thanksgiving I have been thinking a lot about what I am thankful for, I could go on for a while, but here is my top list.

- Our beautiful new niece Emilia!
- Our furbaby who is going to be a Therapy Dog at the hospital!
- A beautiful city and country to live in
- Pumpkin everything and fall in general
- A big Framily scattered around the world that although far, remain so close!
- Hot baths on a cold day #preach
- The will power to live out our 6 week detox cleanse *this is preemptive...I am only on week 2...help!*
- For Pinterest, seriously what did we do before it? I have found so many great recipes lately! 
- My friend Nadia for getting me addicted to Cross Fit and my sister-in-law Jen for pushing my running limits and being an amazing coach!
- Grey's Anatomy for being my Thursday night entertainment since.for.like.ever
- For the people who read this blog and the conversations it has started
- For perspective, a sense of humour and our friends and family that keep it real
Thank you, Thank you, Thank you!

                                           Happy Friday Friends! Enjoy your weekend!
             Let me leaf you with a picture of my favourite tree (see what I did there? ;)

Sunday, October 9, 2016

My Favourite Fall Recipe: Pumpkin Hummus with Cinnamon Sugar Tortilla Crackers

It's Thanksgiving weekend here in Canada, which means the leaves are falling, the air is crisp and pumpkin everything is in season!  My friend Karen introduced me to this recipe a couple years ago and it was love at first bight!

It tastes like your eating pumpkin pie, but it's healthy!
After rinsing the chickpeas, let them dry off, then rub them with  paper towel to get the skins off
ingredients in a food processor
Combine the chickpeas, pumpkin, spices, maple syrup and melted coconut oil in a food processor 
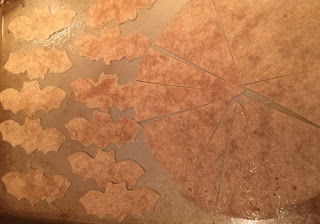
bat shaped tortilla crackers
I used a cookie cutter to cut out bat shapes, then a pizza cutter to make the others
Pumpkin Hummus with Cinnamon Sugar Tortilla Crackers

Ingredients

Hummus
1 can of chickpeas (rinsed, drained, and de-skinned)
1/4 cup of maple syrup
2 tsp of pumpkin spice
3/4-1 cup of canned pumpkin  (I tend to add closer to a cup)
2 tsp of coconut oil (melted)

Cinnamon Tortilla Crackers
Whole wheat tortillas 
Coconut oil (melted)
Cinnamon 
Sugar or Truvia

Directions

Preheat the oven to 350 degrees.

Rinse the chickpeas, let them dry in a strainer or on some paper towel. Rub the chickpeas with another sheet of paper towel in order to get the skins off. I think this is a gross job and its very time consuming, but do it anyways.

Next, combine all the ingredients in a food processor. It can take a while before the hummus becomes smooth, so don't worry if it takes 6+ minutes of pulsing or full blending.

To make the crackers spray a cookie sheet with cooking spray. Take the tortillas and either use a fun cookie cutter to cut out the shapes or use a pizza cutter to quickly make them into triangles. Brush the melted coconut oil on the tortillas, sprinkle with sugar or Truvia and cinnamon. Place on the cookie sheet and let them bake for 5-6 minutes. Then flip them over, brush with more coconut oil, cinnamon, and sugar and bake for another 5-6 minutes. Watch them carefully to ensure they don't burn.

That's it that's all! Serve them up, it will go quickly.


Happy Thanksgiving!


Thursday, October 6, 2016

Organization Deals - Erin Condren 25% off Life Planners!

Listen up friends, until Oct 10/16 Erin Condren Life Planners are 25% off. These NEVER go on sale, so if you are going to order one for 2017...do it now! If you use this link you will get an extra $10 off as well. Once you click the link and make an account, you will get an email with the $10 off coupon to use within 30 days.
I just ordered mine and a new clutch (this is key to keeping my million papers inside my planner). I cannot wait to get them!

Happy planning, organizing, thanksgiving weekend!!

Erin Condren Life Planner & Carry-All Clutch

Thursday, September 29, 2016

Operation Organization: Kitchen Edition

I have been slowly purging and reorganizing my kitchen cupboards, I have no idea why, but this seemed like a great summer project. It.was.not. although I am quite happy with the end result!

We have a small pantry, which I am hoping to build out to have deeper shelves and a full door, rather than the small folding doors we have currently. There is a foot and a half of unused space  (where the calendar is in the picture below) and this would increase our storage space exponentially. I would like it to look something like this...

In the mean time however, before this project began it looked like this.


                                                             Ya, I know. Totally gross.

To start this project, I looked at every single item in there and purged 1/3 of it (mostly expired & unused items). Next, I planned what I needed in jars versus cans or original packaging and then I went shopping! Our Dollarama sells great glass jars with screw on lids so I started with purchasing way more then I thought I needed (but did). While these were running through the dish washer, I took every single item off the shelf, cleaned the shelves, lined them with no slip mats and rearranged the sizes of the shelves.

Then I transferred as many items as I could to the jars. Already, things looked so much better, I love seeing what I have at a glance and how much of it.

Here's me, mid purge when it was +35'c on my holidays, in my kitchen, with no air conditioning. Argh. This makes a wayyyy better fall project!


Next up was my large baking ingredients like flour. You will see in the before picture I had a monster jar. Well that monster jar held too much flour and knocked my shelf down a few times, so I tossed it and replaced it with 3 smaller ones from Target.

Once all the jars were filled and in place I bought chalkboard labels from Michaels (scrapbook section), sharpened my chalk with a knife and began labeling everything. It was/is so satisfying,  I am such a organization nerd.

For my jars and bottles I organized them by size and type, stacking up any doubles. I placed all the  bottles on a slant and spaced apart so I can see what everything is at once, without moving anything around.


TA DA! The AFTER!!


This is my favourite part of pantry!

BEFORE & AFTER SPLIT SCREEN


Side note: I'm sorry my pictures are not the best quality. I was going to reshoot the after pictures and maybe I still will, but the before are stuck being crappy. I need to move on from my iphone pictures #goals

Friday, September 23, 2016

Crock-Pot Recipes: Pepperoncini Roast

It's officially fall - YAY! My house is mostly all decorated, my pumpkin spice candle is regularly burning AND Grey's Anatomy started back last night #canigetanamen?! One of my favourite things about fall is getting back into crock-pot recipes. Making chili in the summer just isn't the same so I usually take a summer break...but it's time... Ladies and Gents...Crock-pot season is back and boy is it wonderful!

My crock-pot works quickly so if I am making something during the week, I will usually run home at lunch throw everything together and when I come home, voila, dinner is served!

This recipe is so simple it's ridiculous and Jeff loves it, so it's a regular in our crock-pot rotation. Whenever there is a nice roast on sale - boom. Just make sure you have the other ingredients on hand.

Ingredients:

1 Roast (any size you want)
1-2 Large jars of pepperoncini peppers (local friends - get these at Safeway, Metro never has them)
2 Beef OXO cubes
3 Garlic gloves (sliced)
Salt & Pepper

Directions:
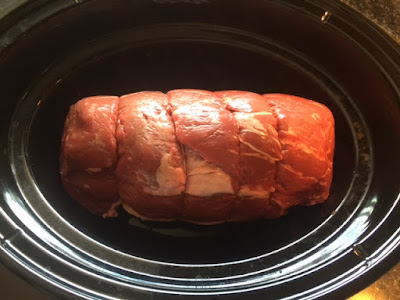
Roast in a crockpot
Step 1...place roast in crock-pot

Roast in a crockpot and ingredients - pepper, salt, beef oxo cubes, garlic and pepperoncini peppers
Step 2 Add peppers with juice, 2 beef oxo cubs (break them into pieces and sprinkle around), salt & pepper and a couple garlic cloves ( I like to cut little slits in the beef and stick them in)

Roast ready for cooking in crockpot
Step 3 - TA DA all ready to go - leave for 3-4 hours on high


There is no after picture because as soon as it was done, I immediately started eating the peppers, they explode with burning hot (and spicy) juice and I forgot. The roast becomes stringy, in the best possible way, and the flavour is as Mel B would say "off-the-chain."

Tuesday, September 13, 2016

Back to School Favourites: My Fall Must- Haves!

Let's face it, even when you are an adult, back to school means new clothes!

New season - new clothes - new me!

Well, not quite, but I am feeling like a new my new glasses with my new NIECE!!
newborn baby
Ahhh look at her!! She gets her own post - stay tuned!

 Here are some of my back to school must haves, see below for links. 

My Fall Must Haves - boots, scarf, slippers, leather jacket, tory burch purse, red lipstick, makeup brushes
 I realize its a very dark palette and I'm okay with that!
Drooling over this cozy grey coat - Soia & Kyo

Scarf - Zara

Makeup Brushes - Vanity Planet
I scored this set for $40 usd about a month ago and I LOVE them. Brush sets can always be disappointing, however these are not. They are so soft, great application and love the roll up package they come in. I have a few expensive brushes, but these are holding up and working just the same!

Mac Lipstick: highly rated Ruby Woo

Slipper- Ugg I have almost worn my first pair out, I love them. The hard soles are great for indoor/outdoor!

Leather jacket - Aritzia

Boots - Sam Edelman Nordstrom

Purse -Tory Burch Similar Here from Nordstrom


Monday, August 15, 2016

Looneyspoons' Asian Coleslaw with a Sesame-Ginger Dressing

I am not going to lie to you... I love me some cabbage salad. It's a slight food obsession of mine. I'll eat it non-stop for a couple weeks, then take a break for 5 months. Well, guess what peeps?!  I am currently mid obsession because I found a new recipe and naturally, I need to share it with you good people.

Typically I buy the coleslaw prepackaged mix, toss with 1/2 olive oil and 1/2 seasoned rice vinegar, add some nuts de jour and maybe avocado...but today, I share with you the Looneyspoon ladies delicious Nat King Coleslaw recipe.

I have eaten it the last 3 days and need to make batch number 2 #cantstopwontstop

Cabbage is some good ol diet food as well. *small digression* I once went out to camp with my grandma for a week after coming home from university (tired, hungover, fat, hungover, tired - you know how it goes). In a week of watching movies, stuffing my face with our simple cabbage mix noted above and even our infamous camp gingerbread cookies I lost 8 lbs. I came to town a new woman. Thank god for cabbage and Grandma Max.*digression over, you can keep reading*

Ingredients

Dressing
1/2 cup seasoned rice vinegar
1/4 cup pure maple syrup
2 tbsp reduced sodium soy sauce
1 tbsp sesame oil
1 tsp grated gingerroot

Salad
1 pkg (about 1lb) coleslaw mix
2 cups bean sprouts
1/2 cup chopped green onions
1 large Red Delicious apple unpeeled, cored and shredded ** I used 2 Granny Smith Apples peeled & finely chopped instead because GS are the only kind of apple in my eyes**
I also added some peanuts and slivered almonds

Directions

Wisk dressing ingredients in a small bowl. In a large bowl combine all of the salad ingredients and toss with dressing. Refrigerate at least 1 hour before serving.

Good news, this salad tastes as good or better on day 3.

Cabbage Salad
All ready for tossing 


Thursday, August 11, 2016

Our Canoe Trip

I am happy to say we returned safely from our canoe trip adventure! I was nervous going with just the 3 of us, but we were just fine. I edited our packing list in this previous post and added things I wish I had brought, thankfully there were not many. 

The weather held out for the most part and we spent the weekend fishing, swimming, playing cards, paddling around and cooking! We are so lucky to have these beautiful provincial parks in our back yard for exploring and enjoying.

I only brought my cell phone because it has a waterproof case so my pictures are limited. 
 
View from our campsite - with a beautiful rainbow and no one else in sight!

Things I have learned from this trip:
- Spending time in nature is good for the soul
- Paddles work very well as serving tools
- I only want to be on camping trips as long as the ice, in my cooler full of drinks, survives (3-4 days) #glamping
- I am super into ciders this summer, specifically this delicious grapefruit raddler - try it!!
- Always bring decent pillow & sleeping pills (or gravol)
- I am so glad a married a guy who enjoys and is useful in the outdoors! *put this on your list ladies*
- Plan at least one camping trip per year

Friday, August 5, 2016

Canoe Tripping: Meal Plans, Supplies & Packing List with updates


We are headed on our annual canoe trip today and for the first time, we are taking Finnegan. I am a little unsure of how it will all go, but here's hoping it works out. This year we are going for 3 days and 2 nights. I always google what other people bring to look for new ideas, so here is our list for meals, clothes and supplies.
* updated post trip with added items and crossed out things we didn't need*

Menu Plan

Breakfasts
- Eggs, for making scrambled eggs and for fish batter (cracked into a plastic water bottle for easier transport)
- Instant oatmeal
- Protein bites (recipe here)

Lunch
- Quinoa Salad (I made this one here)
- Cans of tuna
- PB sandwiches 

Snacks
- Pistachios
- Beef Jerky
- Licorice 
- Cut up pineapple
- Spitz

Dinner
- Fresh pickerel 
- Potatoes
- Pasta and sauce
- Italian sausages 

Cooking extras:
- salt, pepper, butter, parmesan cheese

Ready to be packed away

Packing List

Matches
First aid kit
Flash lights/head lamps 
Extra batteries
Water proof speakers/ipod
Bug spray
Sunblock
Scissors
Knife 
Garbage bags
Rope for misc. things and clotheslines & clothes pins
Toilet paper (in a ziplock bag)
Shovel (you can imagine for what)
Pot and frying pan
Spoon and flipper
Extra ziplock bags (for fish)
Plates/bowls/cups/sporks
Biodegradable dish soap, cloth and bucket for doing dishes
Travel Mugs
Water bottles (1 case frozen to be our freezer packs and drinking water)
Bottled water
Water purifier
Axe
Saw
Life jackets
Towels
Frisbee
Deck of cards
Book we were too busy fishing lol
Sleeping bags
Travel pillows (huge mistake, uncomfy as all heck - bring better pillow next time)
Cooler
Beer/drinks & coozies
Camping chairs
Tent
Stove
Fish filet knife
Fishing rods and tackle
Map
Bear bangers
Cell phone (no service but will use for pictures)
Cell phone portable charger
Canoe
Paddles (seems obvious, but don't want to forget lol)

I packed each Jeff and I our own snack/drink bag to have handy while canoeing. I put frozen waters, flavoured soda water, can of tuna, licorice and pistachios in mine.
My cooler bag


Clothing
This is what I will be bringing, I am sure Jeff will bring half as much
- 2 bathing suits Forgot about skinny dipping, no bathing suit needed
- 1 pairs of shorts
- 1 pair of capris (workout style)
- 1 pair of sweatpants
- 1 long sleeve shirt
- 2 workout shirts (with built in bras, so no bras required)
- 1 rain jacket with a hood
- 3 pairs of underwear
- 2 pairs of socks
- 1 hat
- 1 buff (similar here) *so good for soaking and wearing around your neck in the blazing sun*
- 1 rash guard shirt
- 1 pair of sturdy, waterproof shoes. I bought these ones (sexy, I know) *seriously best things ever*

For Finnegan (our dog)
He has been treated for ticks
- Dog life jacket
- Towel
- Travel bowls
- Food
- Treats
- Frisbee

                                                                  Look how cute he is! 

dog in life jacket
All ready for his first canoe trip! 


Things I wish I brought:
- Baileys for morning tea and evening campfire drinks
- Some sort of cookie, I can't believe I went 3 days without haha
- Lemon for the fish
- Binoculars for checking out nature!

Thursday, August 4, 2016

Summer Desserts: Coconut Whip Cream & Peaches

Ingredients for coconut whip cream: maple syrup, cinnamon, nutmeg, peaches


If you haven't made coconut whip cream yet, you are missing out...BIG time. Being lactose intolerant I am always looking for new delicious and healthy dessert treats and coconut whip cream on any fruit is the easiest, quickest dessert you could make.

The key to this recipe is always keeping can of coconut whip cream in the fridge UPSIDE DOWN.  When you choose a can from the store, pick one that when shaken does not sound very liquidy, the Thai Kitchen brand seen in the picture above works well. I try to always have a can in the fridge, but you need it to be in there at least 24 hours.


Ingredients:
1 can of coconut milk
1-2 Tbsp of pure maple syrup
1/4 tsp nutmeg
1/4 tsp cinnamon
fruit of choice
mint leaves

Directions:
Open the can of coconut whip cream upside down. Scrap the hard cream into a mix master. You can keep the liquid for smoothies or another recipe if needed. Whip the cream for 1- 2 minutes or until the lumps are gone.

Coconut whipped cream in a mix master

Next add the maple syrup, cinnamon and nutmeg to taste. I always add more spice, but it's up to you.
In a bowl or martini glass spoon a heap or two of the coconut cream and add fresh fruit. Garnish with mint leaves. Makes enough cream for 4 desserts.

Peaches served with coconut whip cream
TA DA - Yum, yum yum!

Wednesday, July 20, 2016

If I'm being honest...thoughts on infertility

If I'm being honest this infertility journey of ours sucks the big one.

Sometimes it sucks less, like when I see friends having to give up fun time for kid duties or when their kids are crying and screaming, but mostly it just sucks.

It's this pain that's right there, barely below the surface, and one wrong thought or look at something baby related and the tears leak. I say leak because I often can't feel them or stop them, they just leak out like my heart is crying and my head can't stop them.

Lately, I question whether I want children at all and then I question, is that only because of this situation? I truly don't know. I am a very optimistic person so then I think maybe this is just the way it is?

I have developed a strange relationship with baby things. Most people can relate to seeing a baby outfit or cute toy and getting the warm feeling of excitement and wonder and joy. Well, that's gone for me, now I feel emptiness, detachment and a little bit of hate. Does this go away? 

I am scared about IVF because I already know all about the joy of finding out you're pregnant, but sadly I also know about the fear that comes with losing 4 pregnancies. I fear that if IVF does work for us, I won't feel the joy and there will be no excitement for us. Will I like baby stuff again? Will it make me happy? Will I have an attachment to the baby?

I watch friends with all their innocent happiness in complete baby mode and envy their journey that seems so effortless. Every time I see a baby announcement on social media, it feels like a punch in the gut. I wonder if we will get to use one someday or will it just be another unused one? Will I get the chance to complain about a  #babybump  or brag about #bestbabyever ?

I do feel joy and excitement for friends and family and their babies, but I also feel pain. If our situation was different, would I know what to say to say to someone in our position? I am not sure I would, it's pretty impossible to understand if you haven't been through it. That being said, I feel a deep appreciation to our friends and family who make such an effort for us. I hope our situation opens your eyes to what others may be going through and makes you sensitive to people's unknown situations.

I am not trying to say it's all bad because it's not. This journey has strengthened our relationship and made us so open and unbelievably caring and understanding of each other. We have made a point to spoil ourselves and make the best of our summer and time together and for this, I am truly grateful!

Our next steps are to dig through a giant stack of IVF contracts and sign a hundred pages, get training on all the medications and processes and wait for our date to begin (we hear this fall/winter).

I hesitate in posting this one as I feel vulnerable and negative and I know other people may be going through worse. I also don't want to take away from anyone's joy of their babies and pregnancies #debbiedowneralert. Daily, we are reminded of how lucky we are for everything we have, especially with what is going on in the world today. I am thankful for a million things in our lives, but this blog is my outlet for being honest and open, and if I'm really being honest, I just need to say one last time, infertility sucks and it's hard and I hurt.

Monday, July 18, 2016

Homemade Pesto

If there is one thing you try making this summer, let it be pesto. Nothing is easier or will be more delicious compared to store bought.

fresh basil

Pesto ingredients in small food blender

Bowl of freshly made pesto
Ingredients:
2 cups of fresh basil leaves
1/4 -1/2 cup of olive oil
handful of nuts or seeds (pine nuts, cashews, pistachios, I used pumpkin seeds)
1/4 cup of Parmesan cheese
6 fresh garlic scapes (or 2 garlic cloves)
salt and pepper to taste

Directions:
Rinse and pat dry the basil leaves and garlic scapes. Place all ingredients in a blender or food processor and voila! It will make lots, but if you keep it in a sealed container in the fridge it will be good for six months. You really cannot go wrong, just add ingredients as you keep tasting, you can even add some spinach. 

So go forth and blend, blend it real good!

Wednesday, July 13, 2016

Peanut Lime Chicken with Cold Rice Noodles

My friend Nadia is an amazing chef, who always makes delicious, out of the ordinary meals; she's my #chefspiration. She made me this dish below and it left me craving it for two weeks, until I ventured to make it myself. I posted a picture on Instagram and many friends have been asking me for the recipe, so I thought I would do a quick post about it.
 
I didn't reinvent the wheel so I'll pass you on to the fancy lady that made this recipe so good -  Smitten Kitchen.

The only changes I did make were that I used chicken breasts instead of thighs and I ran out of fish sauce for the peanut sauce and it still tasted delicious! The mint is a must for toppings because it adds the perfect finish to all of the flavours!  This recipe can take awhile if you do all the parts at once, so I would recommend marinating the chicken and making the sauces the day before to save yourself some time.

Bottom line - just make this, it will not disappoint!

Assembly line of ingredients for Peanut Lime Chicken
Assembly line of ingredients

All ready to eat!


Wednesday, July 6, 2016

What's in my: fridge? (the non-celebrity version)

I always think its fun to see what other people have in their fridges, so I thought I would share mine with you today. Like everyone else, our fridge has been slowly overtaken by condiments, and mostly those that we needed for a recipe once and haven't used since, or all those fun hot sauces people brought us back from vacations (thank you to those friends but *EAR MUFFS*) we've never even opened most of them. I think our fridge is reaching 75% condiments.

New to my summer goal list -  Operation: Take Back the Fridge

My preference is to have a fairly empty fridge, so that I can see exactly what is inside and make use of everything. I also feel overwhelmed when it is full. My mother always had  has an overstuffed fridge and this makes me crazy *sorry mom.*  

Before I show you mine, I must declare that my fridge envy award goes to Yolanda Foster: